
Messaging
Messaging is the built-in multi-channel end-user outreach engine of Agentbase 2.10.0. It supports sending Email, SMS, and Push Notifications to project end users via a unified Console wizard and server-side API, and provides Provider credential management, Topic group broadcasting, Subscriber / Target precision delivery, and full state machine management for immediate send, scheduled send, and drafts.
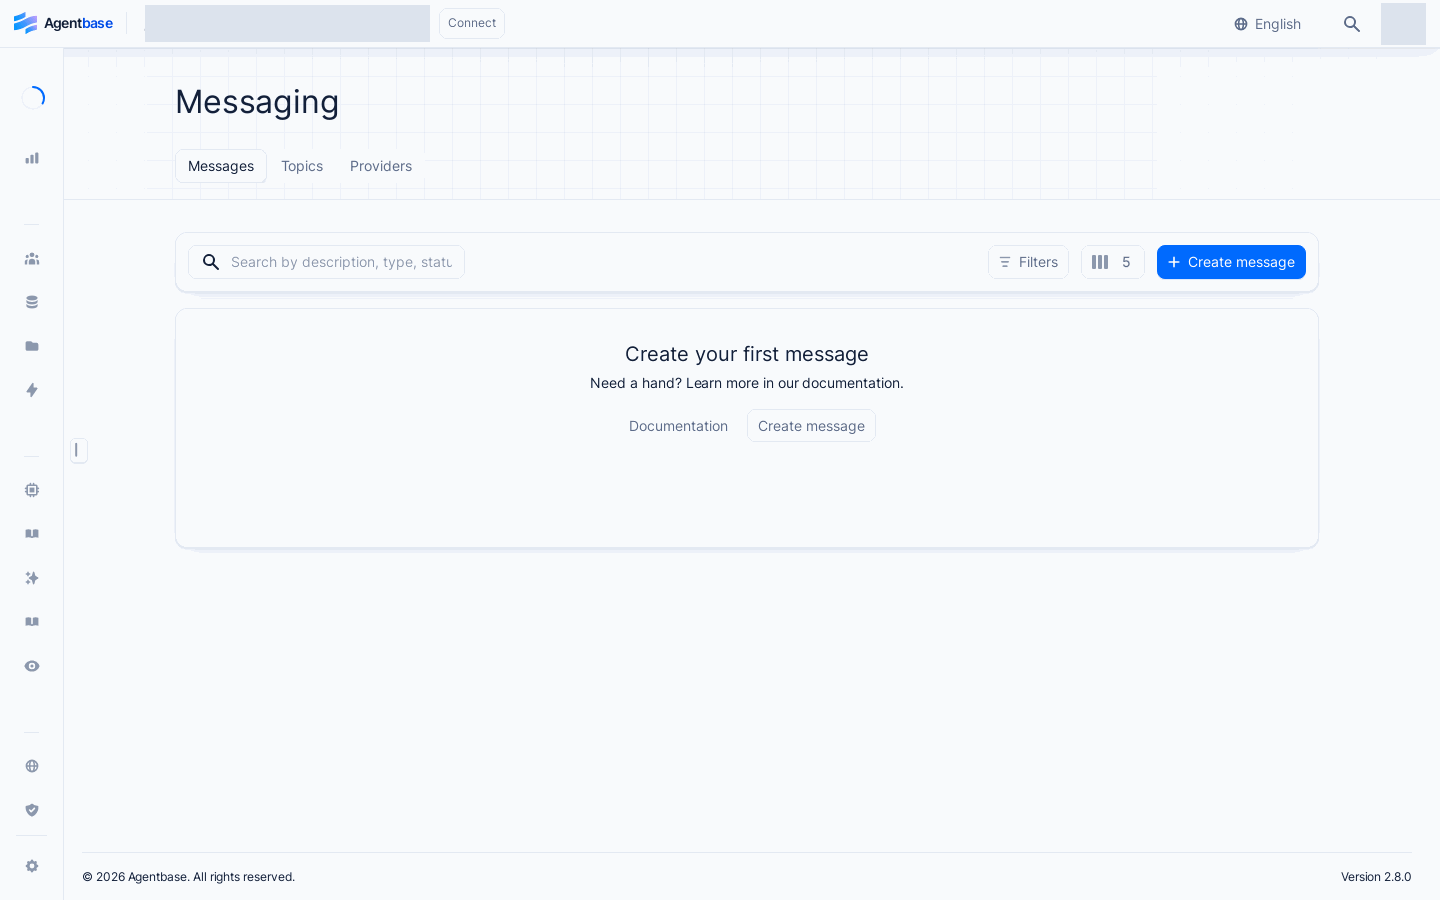
Interface reference: reuses previously registered historical screenshots; demo data may differ from the current project; no new screenshots were taken this time.
Feature Overview
In the real-world operations of enterprise intelligent customer service and knowledge platforms (such as the production template project enterprise-ai-hub-210), when the status of a high-priority technical support ticket submitted by a customer changes (e.g. TK-20261022-001), or when an agent identifies a complex issue and escalates it to second-line expert seats, the system needs to promptly notify the relevant customers and on-duty engineers via email, SMS, or in-app popup.
Agentbase Messaging consolidates heterogeneous third-party channels under a unified Provider → Topic / Target → Message abstraction model:
Three channels and 11 mainstream sending Providers ready out of the box:
Push — mobile push notifications: Integrates Firebase Cloud Messaging (FCM) and Apple Push Notification service (APNs).
Email — email notifications: Integrates Mailgun, SendGrid, Resend, and standard custom SMTP.
SMS — text messaging outreach: Integrates Twilio, MSG91, Telesign, Textmagic, and Vonage.
Precision and group delivery based on user notification Targets: Deeply integrated with the project's Auth module, each end user (e.g.
user_zhangwei_001) automatically maintains verified email addresses, phone numbers, and Push Tokens for multiple mobile devices; supports batch broadcasting by Topic or targeted sending to a single selected Target.Flexible delivery scheduling and lifecycle control: Supports saving as a draft (
draft) for repeated proofreading, setting a future time for scheduled sending (scheduled, which can be rescheduled or withdrawn back to draft at any time before the appointed time), and immediate queueing and sending (processing → sent / failed).
| Core sub-tab | Console route path | Core managed objects | Required write-permission Scope / organization role |
|---|---|---|---|
| Messages | /console/project-{region}-{project}/messaging | Create Email / SMS / Push messages, manage drafts and scheduled sends, view delivery status and error logs | messages.write (owner / admin / developer / editor; read-only roles can only view) |
| Topics | /console/project-{region}-{project}/messaging/topics | Create topics, add/remove subscribers from Auth user Targets, configure client subscription permissions (Subscription access) | topics.write |
| Providers | /console/project-{region}-{project}/messaging/providers | Create and enable/disable third-party Email / SMS / Push channel credential instances | providers.write |
Core Concepts and Architecture
In the Messaging module, successful delivery of a message to an end user depends on the coordination of three elements: an enabled channel Provider, a valid user notification Target or subscribed Topic, and the asynchronous delivery state machine:
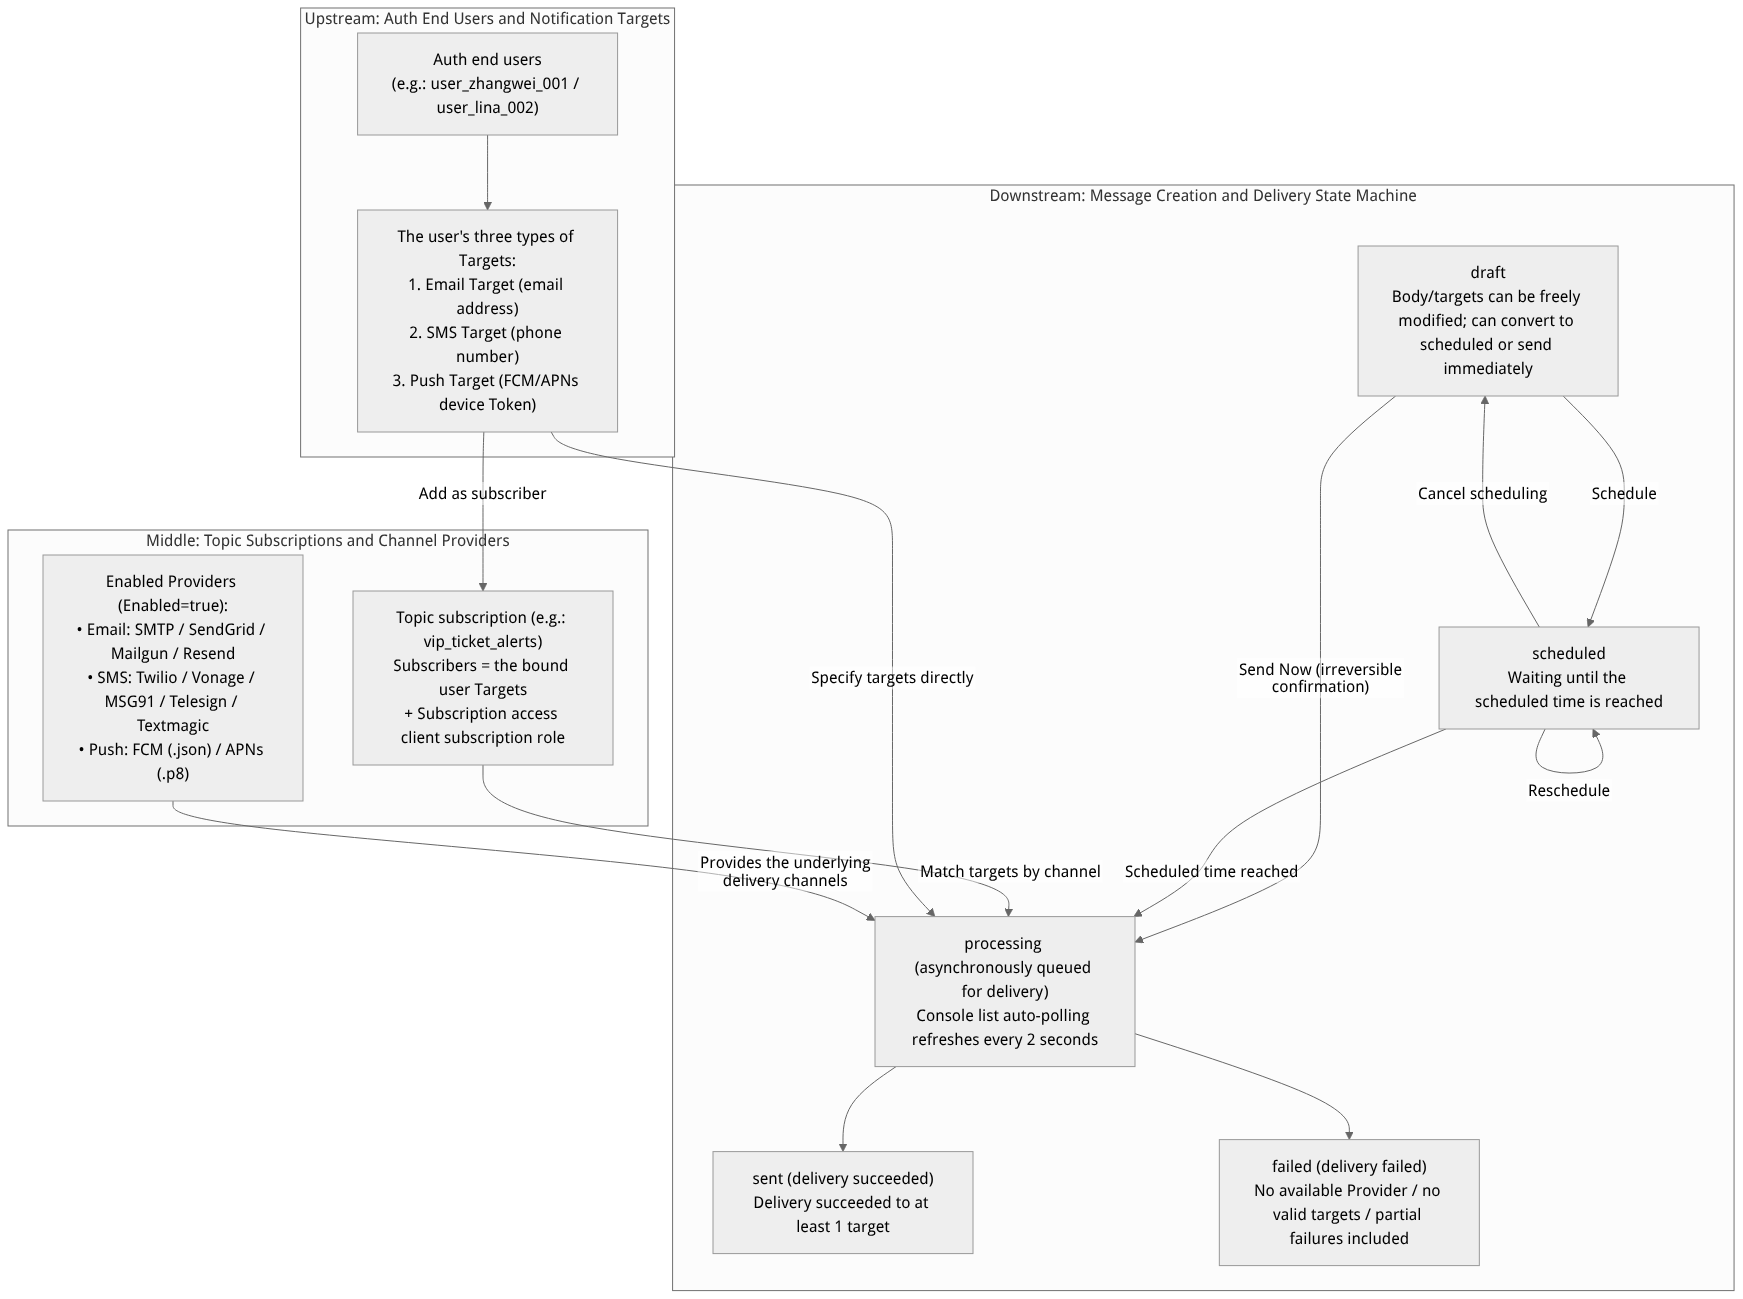
Flow diagram, not a runtime screenshot; read the relationships between steps or states along the arrows.
View the flow diagram in full size
1. Matrix of the five message lifecycle states and executable operations
Every message is in one of the following five states from creation to terminal state. Since SMS, email, and mobile push notifications cannot be physically recalled from a user's phone once sent, the system strictly constrains the executable operations in each state:
| State identifier | State meaning and UI behavior | Allowed operations | Irreversible risks and boundary notes |
|---|---|---|---|
draft | Draft state: Saved only in the database, not yet queued for sending | Edit subject/body, add/remove recipient Topics/Targets, convert to scheduled send, send immediately, delete draft | The safest proofreading state; before broadcasting important notifications, it is recommended to save as a draft for review first. |
scheduled | Scheduled state: A future send time has been set, waiting for the scheduler to trigger | Reschedule (modify the scheduled send time), Cancel scheduling (cancel the schedule, the message safely returns to draft draft state for further editing), delete the record (also cancels delivery) | Can be withdrawn losslessly or rescheduled at any time before the scheduled time arrives. |
processing | Delivering: Entered the background Worker send queue, the Console list auto-polls and refreshes status every 2 seconds | Editing is disabled and the delete card is not shown (waiting for asynchronous delivery to complete) | The immediate send confirmation dialog explicitly warns This action is irreversible. (the operation is irreversible). |
sent | Delivered: At least one Target has completed delivery successfully | View delivery details, Delete the record from the list | Deleting the sent record only removes the historical entry from the Console list and will never withdraw or recall messages already delivered to user devices. |
failed | Delivery failed: No enabled Provider for the current channel, no valid Target for the channel under the selected topic, or the third-party channel returned an error (Note: partial target failures are also counted as failed, with no separate “partially succeeded” state) | Click Details / View logs to view itemized error details; delete the record from the list | Records already in processing / sent / failed cannot be edited in place and resent; a new message must be created to resend. |
Roles, Entry Points, and Relationships
1. Console access entry points (direct URL and command center)
Important navigation tip: In Agentbase 2.10.0, to streamline the main left navigation bar, the Messaging module is not displayed with an icon in the left sidebar by default (it is a built-in hidden navigation item), but its frontend routes and backend services are fully available.
You can enter the Messaging workspace at any time using either of the following two methods (as shown in Figure 1):
Direct URL in the browser: Visit
/console/project-{region}-{project}/messagingdirectly after the project path (for example, the production template project address ishttps://appbuild.oceanbase.com/console/project-default-enterprise-ai-hub-210/messaging).Console shortcut command center: Open the global command search box on any Console page and type
messaging,topics, orcreate messageto jump directly.
2. Relationship with project Auth user Targets and custom SMTP
Recipient sources (Auth Targets): All recipients in Messaging are taken from the project's Auth → Users → target user → Targets tab (see Messaging targets). When creating Topic subscribers, you select the user's specific notification targets (e.g. one of the user's email addresses or the Push Token of a particular iPhone), not an abstract user ID.
Platform/project system emails vs. Messaging business emails:
The server configured under the project's Settings → SMTP is used to send the Auth module's system verification emails, password reset emails, and team invitation emails.
Email Providers created under Messaging → Providers (supporting Mailgun, SendGrid, Resend, SMTP) are dedicated to sending business notifications, ticket status reminders, and operational broadcast emails to end users; the two configurations are independent of each other.
Feature Details and Operation Guide
1. Configure and enable sending Providers
Before sending any messages on a channel, you must first create and enable at least one sending Provider for that channel:
Visit
/console/project-default-enterprise-ai-hub-210/messaging/providersand click Create provider in the top-right corner.Select the messaging channel (
Email,SMS, orPush), fill in the Name and a custom Provider ID ($id), and complete the required fields following the built-in wizard guidance on “how to obtain third-party credentials”:
| Messaging channel | Available Provider types | Required credentials and core configuration fields | Production configuration notes |
|---|---|---|---|
| Push (mobile push notifications) | FCM (Firebase) | Upload the Google Firebase Service Account JSON file | Ensure the Firebase project integrated into the client Android / Web / iOS apps matches this service account. |
| APNS (Apple) | Team ID, Bundle ID, Key ID, upload the Apple .p8 signing key file, and optionally enable the Sandbox toggle | For production releases (App Store), be sure to turn off the Sandbox toggle; enable Sandbox for development debugging on physical devices. | |
| SMTP | Server host, Port, Username, Password, Encryption (TLS/SSL/None), sender email address and name | Suitable for integrating self-hosted enterprise mail servers, Alibaba Cloud DirectMail, or Tencent Enterprise Mail. | |
| SendGrid / Resend | API Key + From Email (sender email) + From Name (sender name) + optional Reply-To | The sending email domain must have completed SPF/DKIM verification on the SendGrid / Resend side. | |
| Mailgun | API Key + Domain (sending domain) + EU Region toggle + sender email and name | If the Mailgun domain is created in the EU region, the EU Region toggle must be turned on. | |
| SMS (mobile text messages) | Twilio / Vonage / Telesign / Textmagic | Platform account credentials (e.g., Twilio Account SID + Auth Token) + From Number / Sender ID (sending number) | Recipient phone numbers must include the international country code (E.164 format, e.g., +86...). |
| MSG91 | Auth Key + Sender ID + Template ID (SMS template ID, required) | Must strictly match the registered and approved SMS template ID. |
Manage and enable/disable Providers:
After creation, go to the Provider detail page and confirm the status toggle at the top is set to Enabled — the Messaging delivery engine only routes messages for a channel to Providers currently in the
Enabledstate.All API Keys, passwords, and
.p8/.jsonprivate keys are stored encrypted on the server side after saving, and the interface applies one-way masking and never displays them.Deletion risk: deleting a Provider from the Danger zone at the bottom of the detail page will permanently remove that channel configuration and cannot be undone.
2. Creating subscription Topics and managing Subscribers
When you need to broadcast notifications to a group of end users with shared attributes (for example “all second-line on-duty customer service agents” or “VIP customers subscribed to system maintenance announcements”), using Topics avoids manually selecting recipients one by one each time:
Switch to the Topics tab (path
/messaging/topics, as shown in Figure 1), click Create topic, and enter the topic name (e.g.,enterprise-vip-ticket-notify) and an optional custom Topic ID.Add subscriber targets (Create subscriber):
Open the detail page of the newly created topic, and on the Subscribers tab click Create subscriber.
In the dialog, expand the project Auth user list and check the specific Targets under the target user (for example, check the corporate email Target and the mobile Push Target of
user_zhangwei_001). Multiple subscription records can be checked for batch removal.
Configure client self-subscription permissions (Subscription access):
Switch to the Settings tab of the topic detail, and in the Subscription access area add role selectors (e.g., add
usersorteam:support_team) to control which frontend logged-in users can subscribe to this topic on their own via the client SDK.
View audit logs (Activity): Switch to the Activity tab to trace the audit history of the topic's creation, renaming, and subscriber additions/removals.
3. Creating, scheduling, and sending multi-channel messages (Messages)
Switch to the Messages tab (path
/messaging), click the Create message dropdown button in the upper-right corner, and select the channel type to send (Email / SMS / Push) to enter the three-step creation wizard (Message → Targets → Schedule):
Step One: Compose the message content (Message)
| Channel type | Required content fields | Character length and format constraints | Channel-specific enhancement configuration |
|---|---|---|---|
| Subject (email subject) + Message (email body) | Supports plain text or rich-text HTML | You can enable the HTML mode toggle to send beautifully formatted HTML emails; an optional custom Message ID is supported. | |
| SMS (text message) | Message (SMS body) | Up to 900 characters | It is recommended to keep the copy concise and include a compliant signature to avoid overly long SMS being split and billed as multiple segments by carriers. |
| Push (mobile push notification) | Title (notification title) + Body (notification body) | Body up to 1000 characters | • The right side of the wizard provides a real-time phone lock-screen notification preview; • Optionally bind a Media (image file in a storage bucket) to enable rich-media large-image push; • Optionally add Custom data (custom Key-Value pairs), which is invisible to end users and is read by the client app after the notification is tapped to navigate to a specific support ticket detail page (e.g., {"ticketId": "TK-20261022-001"}). |
Step Two: Select recipients (Targets)
In step two of the wizard, you can add one or more Topics, or directly check specific user Targets (both can be combined, but at least one topic or one target must be selected).
Automatic channel matching rule: If you create an
Emailmessage and select a Topic containing a mix of subscribers with emails, phone numbers, and Push Tokens, the system will automatically filter out only the Email Targets under that Topic for delivery.
Step Three: Choose the send timing (Schedule) and verify results
Send now (Now): Click send and confirm in the confirmation dialog (which shows the estimated total number of targets reached and an irreversible-action notice); the message immediately enters the
processingstate; the list auto-refreshes every 2 seconds, and upon completion it changes tosentorfailed.Scheduled send (Schedule): Specify a future date and time to submit, and the message enters the
scheduledstate; before the scheduled time, you can click Reschedule to change the date or Cancel scheduling to return it to draft at any time.Save as draft (Save as draft): Save in the
draftstate, then formally send later after confirming everything is correct.
FAQ and Troubleshooting
Q1: Why can't I find the "Messaging" menu item in the project's left navigation bar?
Cause and troubleshooting steps: In the current Agentbase 2.10.0 version, to keep the main sidebar compact, Messaging is a sidebar entry hidden by default, but its frontend and backend functionality is fully ready. Please visit /console/project-{region}-{project}/messaging directly in your browser address bar (replacing {region} and {project} with actual values, e.g., /console/project-default-enterprise-ai-hub-210/messaging), or use the Console global command search box to enter quickly.
Q2: In the "Select recipients (Targets)" step of creating an Email or Push message, why doesn't my newly created Topic appear in the selectable list?
Cause and troubleshooting steps: When filtering selectable Topics, the sending wizard automatically checks whether the topic contains subscription targets (Targets) matching the currently selected message channel. For example, if you are creating a Push notification but your Topic currently only contains users' emails (Email Targets) without any mobile device Push Token subscribers, that Topic will not appear among the selectable recipients for Push messages. Please first go to Messaging → Topics → target topic → Subscribers, add subscription targets for the corresponding channel, and then create the message.
Q3: After a message is sent, its status changes to failed; how do I determine whether everything failed or only some recipients failed?
Cause and troubleshooting steps: In the Messaging state machine, as long as there is any delivery error (including partial target delivery failures), the entire message status is marked as failed (the system has no separate partially_sent state). Please follow these steps to locate the root cause:
In the Messages list, click Details / View logs on the right side of the
failedmessage to open the detail page.Review the error log details:
If it says
No enabled provider found: Go to the Providers tab and check whether the provider for the corresponding channel (Email/SMS/Push) has been created and its upper-right toggle is in the Enabled state.If it reports third-party channel authentication or delivery errors (e.g., SMTP 535 authentication failure, FCM Token invalid
Unregistered): Verify the specific failed Target ID in the logs, update the Provider credentials, or clean up invalid client device Tokens.