
User Management
Feature Overview
User Management lets administrators manage the project's end-user accounts. Use Authentication → Users in the console or a server SDK to search and manage users, labels, preferences, and related sessions. Available actions depend on the current account's permissions.
By consolidating end users' basic attributes and business extension metadata (such as the vip customer tier label, the architect architect identity label, interface language, and default knowledge base preference) in Auth Users, enterprises no longer need to build redundant account-password tables, session state tables, and password hash verification logic in business databases (such as enterprise_biz_db). They can also seamlessly integrate with Agentbase's long-term memory (Memory) module — for example, an agent can automatically associate long-term conversation facts and user profiles with user_zhangwei_001 (Zhang Wei) and user_lina_002 (Li Na) directly by their User IDs.
Core Concepts and Architecture
Each Auth user entity consists of a "Core Identity" and five associated subdomains (Memberships, Identities, Targets, Sessions, Activity).
Core Concepts and Practical Example Data Table
The following fictional user profiles illustrate the fields; they do not represent data in any specific environment:
| Attribute dimension | Example user 1 (enterprise VIP customer) | Example user 2 (senior technical support expert) | Field constraints and platform behavior notes |
|---|---|---|---|
User ID ($id) | user_zhangwei_001 | user_lina_002 | Max 36 characters; only a-z, A-Z, 0-9, ., -, _ are allowed, and the first character cannot be a special character; when left empty, the system automatically generates a unique ID. |
| Name | 张伟 | 李娜 | Max 128 characters; supports Chinese and multilingual characters; can be left empty at creation and updated at any time afterward. |
zhangwei@customer-corp.example.com | lina.support@agentbase-ops.example.com | Automatically converted to lowercase at creation and enforced as unique within the same project (a conflict returns USER_EMAIL_ALREADY_EXISTS). | |
| Phone | +8613800138001 | +8613900139002 | Must follow the E.164 standard: start with + and include the international country code, with at most 15 digits after +. |
| Status | Verified (email and phone verified) | Verified (email verified) | Includes account enabled state (Active vs the blocked red banned badge) as well as the verification status of the email/phone respectively. |
| Labels | vip, architect | support, internal | Each labelonly allows alphabetic and numeric characters (a-zA-Z0-9), and is automatically mapped to permission roles such as label:vip and label:architect. |
| Preferences | {"company": "远航金融科技", "slaLevel": "P0", "preferredModel": "qwen-plus"} | {"department": "企业智能客服中心", "shift": "day", "workbenchMode": "expert"} | A JSON key-value object; clients can edit it via account.updatePrefs(), and administrators can edit it entry by entry in the Console. |
| Associated long-term memory (Memory) | Extracted customer architecture preferences and OceanBase distributed transaction consultation context | Consolidated standard troubleshooting SOPs and skill distillation records | The Memory module indexes by user_id and builds a personalized user profile. |
Roles, Entry Points, and Relationships
Console Entry Point and Permission Requirements
Access path: Sign in to the console → select a project → select Authentication in the sidebar → the Users tab opens by default (route:
/console/project-{region}-{project}/auth).Detail page path: Click any row in the user list (e.g.,
user_zhangwei_001) to enter/console/project-{region}-{project}/auth/user-{userId}.Operation permission gates:
Viewing the user list and detail tabs requires the organization role to have
users.readpermission (owner,admin,developer,editor,analyst).Creating users, modifying user profiles/passwords/labels/preferences, banning accounts, kicking sessions, or deleting users requires
users.writepermission (onlyowner,admin,developer,editorhave it; thebillingandanalystroles have no write permission).
Relationships with Upstream and Downstream Modules
Automatic creation of message targets (Targets): When an administrator clicks Create user in the Console or creates a user via the API, as long as
Emailis filled in, the system automatically generates aEmailtype Target for that user; ifPhoneis also filled in, aSMStype Target is automatically generated as well, directly available for Messaging and Message targets (Targets) to subscribe to topics and send notifications.Team memberships (Memberships): The Memberships tab shows all project teams the user belongs to (e.g.,
team_support_ops) and the team roles. After the user is removed from a team, their access to database tables (customer_tickets) and storage buckets (kb_enterprise_docs) bound withRole.team(...)is revoked immediately.Long-term memory and user profiles (Memory & Profiles): In memory management and user profiles, the system directly aggregates conversation history, long-term facts, and experience distillation results by the Auth user's
User ID(e.g.,user_zhangwei_001).
Feature Details and Operation Guide
1. Search and Browse the User List
Open Authentication → Users to see the project’s paginated end-user list:
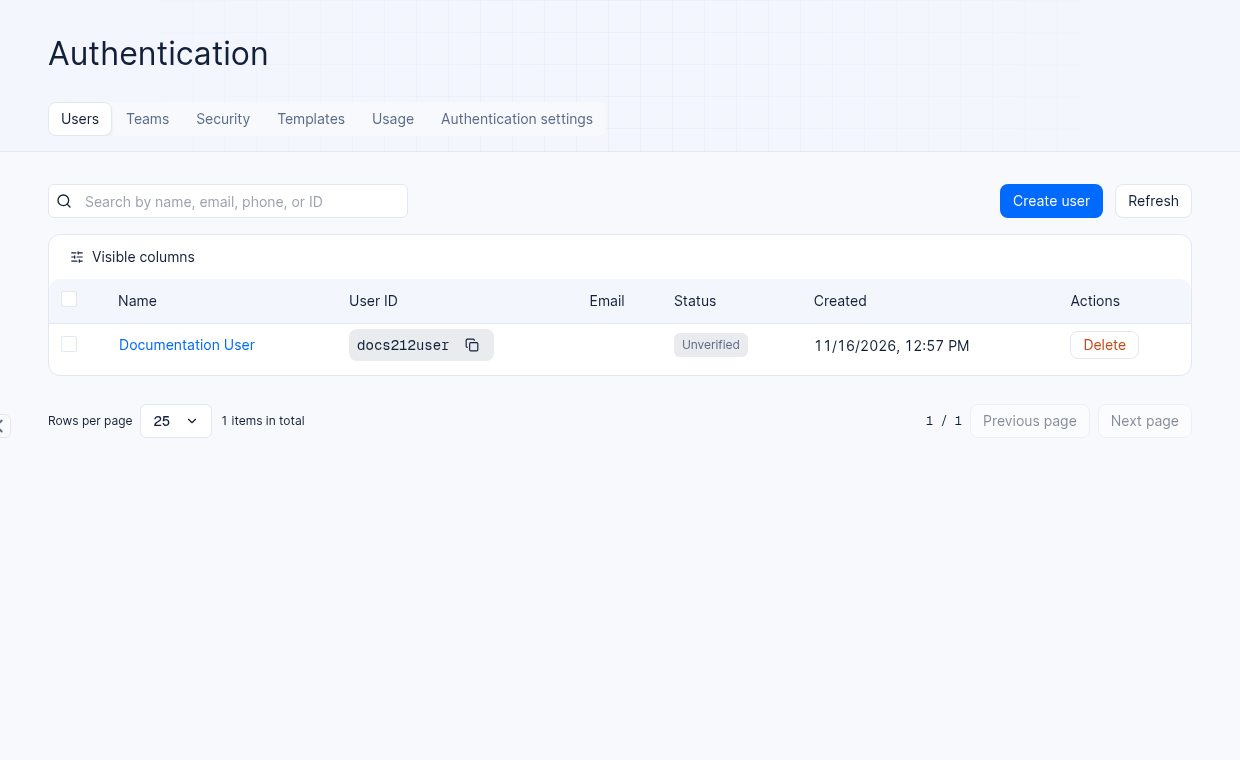
Figure: A synthetic example user in the user list of a 2.12.0 test project.
Multi-dimensional full-text search: The search box at the top supports directly entering a user's name (e.g.,
张伟), email address, phone number, or User ID (e.g.,user_zhangwei_001) for real-time filtering.Table column descriptions and custom columns:
The default columns are name, user ID, email, status, creation time, and actions.
Select Visible columns above the table to show or hide columns such as phone, labels, and last activity.
Batch deletion: After checking the checkboxes on the left side of the list, a batch action bar appears at the bottom, supporting one-click batch deletion of the selected users (the operation is irreversible; proceed with caution).
2. Create an End User (Create user)
In daily operations, besides end users self-registering via the frontend page, administrators can manually create internal support accounts or VIP customer accounts in the Console:
On Authentication → Users, select Create user to open the form.
Fill in the form for the user’s sign-in method. Leave User ID empty to generate one automatically. The service response determines the final validation result:
| Dialog field | Required | Validation rules and input examples |
|---|---|---|
| Name | Optional | The user's display name, max 128 characters. Example: 张伟 |
| Optional | A valid email format; uniformly converted to lowercase before being stored on the server, and must be unique within the same project. Example: zhangwei@customer-corp.example.com | |
| Phone | Optional | Must start with + and include the international country code, with at most 15 digits after +. Example: +8613800138001 |
| Password | Optional | At least 8 characters long (server-side validation range is 8–256 characters). If the project has enabled a password dictionary or disallowed personal data in security policies, the password must also pass the corresponding compliance checks. |
| User ID | Optional | Enter a custom ID directly in the field, or leave it empty to generate one. Example: user_zhangwei_001. |
Select Confirm to submit. On success, the console opens the user detail page (
/auth/user-{userId}); if it fails, check the input and permissions using the displayed error.
3. Complete Guide to the Six Tabs of the User Detail Page
After entering a single user's detail page (using user_zhangwei_001 as an example), you can use the six tabs at the top for comprehensive operations management:
(1) Overview tab: basic profile, labels, preferences, and high-risk security switches
The Overview tab consists of multiple independently saved configuration cards:
| Card name | Core functions and operation steps | Effect mechanism and security boundaries |
|---|---|---|
| Status (account status and verification) | 1. Click Block account to immediately ban the account (when already banned, Unblock account is shown to unblock). 2. Click Verify (or the dropdown menu) to mark Email and Phone as Verify (verified) or Unverify (unverified) respectively. | Banning an accounttakes effect immediately; all existing sessions of that user will no longer pass permission checks. Manually changing verification status does not send a verification email or SMS to the user. |
| Email (change email) | Enter the new email address and click Update. | Updates the user's bound email directly on the server side anddoes not trigger a confirmation email; the new email must likewise not conflict with other users in the project. |
| Phone (change phone number) | Enter a new phone number in E.164 format starting with + and click Update. | Updates the bound phone number directly and synchronizes the associated SMS Target. |
| Password (reset password) | Enter the new password (at least 8 characters) and click Update. | Administrators forcibly reset the user's password. If the project has enabled Invalidate sessions after password change in Security → Session security, the user's existing sessions will be invalidated simultaneously. |
| Labels (user labels) | Enter purely alphanumeric labels in the input field (such as vip, architect), press Enter to add them, then click Update. | Only letters and digits are allowed (no hyphens or underscores). After saving, the user immediately receives the Role.label('vip') and Role.label('architect') permission roles. |
| Preferences (key-value preferences) | Click Add preference to enter Key and Value line by line (such as tier = platinum, preferredModel = qwen-plus), then click Update to save. | Stored in the prefs JSON field of the user object, readable directly by the frontend via account.getPrefs(), with a total size limit of 64 KB. |
| User impersonation | Toggle the switch to allow or forbid this user from impersonating other end users in the project via the Client SDK. | High-risk permission: only grant to trusted internal operations or technical support specialists (such as user_lina_002). All operations performed during impersonation are audited under the account that initiated the impersonation. |
| Multi-factor authentication | Toggle this user's MFA enabled state; if the user has already bound an authenticator app, TOTP (One-time code) and a Delete authenticator button are displayed. | When a user loses their phone and cannot generate TOTP codes, an administrator can click Delete authenticator to remove the TOTP factor (this deletion is irreversible; after removal the user must rebind). |
| Delete user | Click the red Delete button at the bottom, verify the information in the confirmation dialog, and confirm deletion. | Permanent and irreversible: completely deletes the user and all associated Sessions, Memberships, Identities, and Targets data. |
(2) Memberships tab: team membership and role management
Displays the list of all project teams the user has currently joined, with three columns: Name (team name; clicking it jumps directly to the corresponding team detail page, such as
VIP客户技术支持组), Roles (the custom role labels the user holds within the team, such asadmin,support_lead), and Joined (time of joining the team).Remove team member: click the delete icon at the end of a row or check multiple rows to delete in batch, removing the user from the corresponding team (the operation is irreversible; after removal the user immediately loses the data access permissions granted by that team).
(3) Identities tab: third-party OAuth linked identities
When the user has previously logged in via GitHub, Google, or Custom OAuth2 (such as Gitee or enterprise SSO), this tab lists all linked external identities.
Table columns include: Identity ID, Provider (provider name), Email, Expiry Date (OAuth access token expiration time), and Created (time of first linking); the column selector can also open the hidden-by-default Provider UID and Updated columns.
Operation boundary: this tab only supports deleting (unlinking) third-party identities individually or in batch, and provides no manual creation entry (Identities can only be established automatically through a real OAuth2 login flow).
(4) Targets tab: viewing and cleaning up notification targets
Lists all message delivery destinations associated with the user, including Target ID, Target (email address, phone number, or device push name), Type (
Email/SMS/Push), Provider, and Created.Supports checking and batch-deleting invalid targets. For detailed rules, see Message targets (Targets).
(5) Sessions tab: online device monitoring and forced sign-out
Displays all currently active login sessions of this user; table columns include:
Client: client browser and operating system identification information (such as
"Chrome 128 on macOS 14"); if it is the current testing session, a greencurrent sessionbadge is also displayed.Location: country/region name resolved from the login IP (displays
Unknownwhen it cannot be resolved).IP: the client's source IP address (supports one-click copy).
Security design note: to prevent session hijacking, the Console page never displays any Session Token / Secret in plaintext, nor specific expiration timestamps.
Forced sign-out operations:
Sign out a single device: click Sign out on the right of the target device row to immediately destroy the login state on that device.
Force sign-out on all devices: click Sign out all sessions in the upper right of the list and confirm in the dialog to immediately sign out all sessions of this user on all terminal devices (commonly used for suspected account compromise or employee offboarding emergency response).
(6) Activity tab: user-level security audit trail
Displays all key operation audit logs (Audit Logs) related to this user in reverse chronological order, covering events such as login success/failure, password changes, email updates, and session destruction, including trigger time, event name, client environment, and source IP, meeting enterprise compliance audit requirements.
FAQ and Troubleshooting
Q1: When adding a label to a user in the Console, I get a format error. Why can't I input vip-customer or tier_1?
Root cause analysis: Agentbase user labels (Labels) have strict character set validation on the server side: only pure English letters and digits are allowed (a-z, A-Z, 0-9); hyphens (-), underscores (_), spaces, and Chinese characters are not supported.
Solution: Please name labels using purely alphanumeric combinations, for example vip, vipcustomer, tier1, or architect. If you need to store complex business attributes containing special characters or Chinese (such as a company name "远航金融科技" or department code "dept-01"), store them in Overview → Preferences (key-value preferences) instead.
Q2: If an administrator directly changes a user's Email on the user detail page, will the system send a verification link to the new email?
Answer: No. When an administrator modifies the email in the Overview → Email card in the Console and clicks Update, it is a direct administrative overwrite and does not trigger an email. After the change, if the administrator confirms the new email is genuinely valid, they can click Verify → Verify email in the Status card above to switch its status directly to Verified; if you want to trigger the real verification email flow, the end user should call account.createVerification(redirectUrl) from the client.
Q3: After deleting a user, why do the support ticket records created by that user still exist in the business database table customer_tickets?
Root cause analysis: Executing Delete user in Auth → Users cascades a permanent deletion of all of that user's affiliated resources in the Auth and Messaging domains (including Sessions, Memberships, Identities, Targets), but does not automatically physically delete business rows and files in Databases or Storage, preventing the loss of core enterprise support tickets or financial ledgers caused by accidentally deleting a single customer account.
Solution:
After the user is deleted, the
Role.user('user_zhangwei_001')permission on the original ticket row naturally becomes invalid (because valid sessions for that User ID no longer exist), so no privilege escalation risk arises.If the business requires cleaning up or anonymizing business table data when a user is deleted, you can listen to the
users.*.deleteWebhook / Event trigger (configured in the project's Settings → Webhooks or cloud Functions) to automatically perform associated business data cleanup.
Related Documentation
Auth overview: understand the three authentication methods of Session, JWT, and API Key, along with the
Role.user()andRole.label()permission expressions.Team management (Teams): organize end users into business teams and grant custom team roles.
Auth security policies (Security): configure password history, weak password dictionary validation, concurrent session limits, and MFA policies.
Message targets (Targets): view and manage users' automatically generated Email / SMS notification targets and Push targets.
User profiles (Profiles): view agent long-term memory profiles automatically built from Auth user IDs.